
- Gifts & Goods
-
Wallpaper
Luxury Peel and Stick Wallpaper
![]()
- Gift Card
- Gifts & Goods
- Gift Card
Luxury Peel and Stick Wallpaper


Hello!
I’m Emily and I’m @replicatethendeviate on instagram. I’m happy to be on the Raspberry Creek Fabrics blog to share tips and tricks for sewing dance costumes! A huge thank you to RCF for sponsoring my project! 😀
I’ve sewn three sets of dance costumes over the years and this time was much easier/smoother/happier than the previous times!
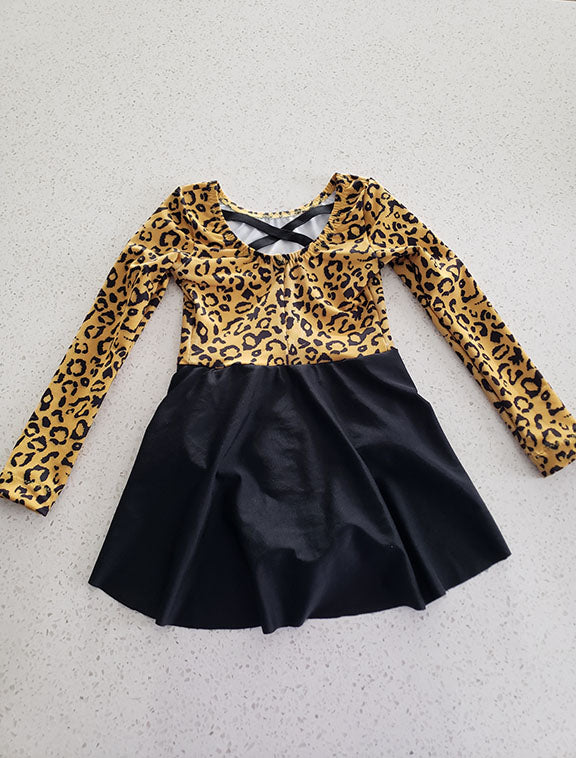
One of my girls’ instructors asked if I would sew costumes for the newest dance team at our studio. I strongly encouraged her to check all of their catalogs/sites for costumes but she couldn’t find anything that fit her vision. She wanted cheetah fabric and a waterfall skirt and long sleeved leotard with an x in the back. We discussed how the wrong side of the waterfall skirt would show and she picked solid black for the skirt which was totally the right design choice.

My favorite place for swim/dance patterns is Jalie. I love how their patterns are drafted and come in a multitude of sizes from toddler through adult. I had sewn the Elizabeth before with the waterfall skirt and I knew that would be perfect. I sent a screenshot to the instructor and she loved it! I printed the bodice of the Elizabeth and the sleeves of the Tessa (the Elizabeth has short sleeves) and realized the bodice/armscye/sleeves are shaped very differently from each other. I decided to use the top of the Tessa and the bottom of the Elizabeth for the look we were going for. The Tessa and Elizabeth have different waistlines so I needed to make adjustments to the Tessa bodice pieces. I had to print the entire Tessa pattern and entire Elizabeth pattern to overlap the pieces and see if the notches were in the same places in both patterns and where to make the adjustments (and draw in the seam allowances). Once I figured out where to adjust the pieces I took pictures with my phone and referred to the adjustments for the other sizes.

I overcame my hesitation and trepidation about custom fabric ordering because this cheetah fabric was perfect and I couldn’t find anything remotely close anywhere else!! I wasn’t sure if the swim knit or athletic performance base would be best so I asked in the Raspberry Creek Fabric Facebook Group and got helpful recommendations from experts who have used both fabrics and have sewn dance costumes. The RCF Facebook group is one of my favorite groups because everyone is so nice and it’s a happy and inspiring place to be!
I went with the swim knit base and it was a delight to cut and sew. The only minor “issue” I ran into this time was needing to use a good lotion for my hands so I wouldn’t snag the reverse of the fabric when handling it. I guess I’ve only ever sewn swim in the spring/summer/fall before the winter hands attack. LOL. Definitely not a true issue but it was a reasonable excuse for not doing dishes for a few nights. Anyway, the fabric cut easily and it doesn’t curl when cut. I used about five stretch needles for these costumes. I think sewing through the elastic kind of dulls the needles a bit and I wanted to have the cleanest finishes.

I prewashed my fabric and dried on extra low in the dryer until about 90% dry. I don’t typically dry swim fabric in the dryer but I like to treat my unsewn fabric a bit rougher than usual. I dried it until 90% dry to cut down on the winter static issues. Every dance costume we’ve ever received from a dance costume company says “do not wash” so it’s nice to have a costume that can be washed at the end of competition season and even worn to the splashpad!

I got the list of measurements and wrote out what sizes each dancer would be in bust, waist, hips, and girth. The previous times I sewed costumes I didn’t account for the time it takes to adjust/customize pattern pieces (I even forgot to account for the time to cut the pattern and fabric the first time. We all know how long that takes!!) and I was offered the suggestion of only offering two base sizes (small or medium) instead of adjusting for each dancer. I was tempted since it would’ve made the process easier/faster and if this team had ordered from a catalog/website they probably would’ve all received the same sized costume. I decided to make all the adjustments though because I didn’t want the fit to reflect poorly on my skills and I accounted for the time it took. There are 15 dancers on the team and they are actually 14 different size combos! One or two of the dancers only needed the two adjustments between the top and bottom of the costume but some dancers needed up to nine adjustments. Depending on height added to the bodice the patterns recommended splitting it in two places on the front and back bodice and on the sleeves. I also adjusted the skirt length for some costumes and the waist in the bodices and the briefs/bottoms and skirt width. I found it easier to sew the costumes one at a time so the pieces didn’t get mixed up between costumes. I sized up one size and .75 inches in girth for all of the dancers because they are growing (they are 4-6 years old). I sewed a practice/sample in a size 5 to make sure my adjustments worked and tried it on one of the dancers that was actually in the class Ansley was an assistant for last year. It looked perfect!
And then it was a lot of sewing! I did decide to do the back black x/criss cross at the same time at the end so I could get the placement consistent between sizes. I managed to finish 13/15 before the break and turned them into the studio so the instructor could add sparkles to the back. I wish I had a picture of all 15 together but hopefully will get one some time during competition season!
Thanks for stopping by and happy sewing!

Comments will be approved before showing up.

Read along as Maggie talks about one of our newest fabrics- Taslan! She made the cutest set of coordinating Anoraks for her four children.

Maggie joins us today to show us how she used a couple of border prints to create new dresses for her daughter.

Elizabeth is here to show a couple of things she has recently made with our boardshort and swim knit. At the end of the post she adds inspiration for other uses for this versatile fabric!


