Estimated Turn Around Time: 4-5 Business Days, most orders are shipping under TAT
January 24, 2023 2 Comments
Hey Y’all! 😊
Today I want to talk about SERGERS! Ahhhhhh, the land of Serger-ville is probably my favorite place to visit (LOL), whether you have a 4-thread or 5-thread serger, using a serger can cut your sewing time down significantly; especially if you are sewing with knit fabrics.
When discussing sergers, the conversation generally centers around the speed of the serger, its seam finishing, and its ability to sew knits together effortlessly without the use of a sewing machine. However, in my opinion, there is one area that is commonly overlooked…HEMMING!
Let’s discuss the different ways you can hem with your serger, outside of the infamous rolled hem 😉.
The first thing we want to do is to check the manual of our serger. Believe it or not, there is usually a section in serger manuals that discusses different ways to finish the edges of fabrics. Here are some photos of the hemming/finishing options in my manual (I have a Necchi S34):
The Table of contents will direct you to the appropriate pages for hemming settings.
The coordinating pages will provide the machine settings needed to achieve the hemming technique.
As you can see in the photos above, these are the options available to me with my serger in terms of hemming. Using the manual is an indispensable tool! It not only provides the settings, but also thread recommendations, fabric recommendations (not all inclusive), tension settings, as well as graphics to help us determine if our stitching looks correct.
Below are samples I used to demonstrate a couple of the hemming techniques:
Rolled Hemming:
This technique, literally “rolls” the fabric on itself and it gives the hem a bulbous texture, this type of hem you usually see in the “lettuce” hemming technique, but you can achieve a non-lettucey (haha definitely not a word ;P) rolled hem as pictured below.
*TIP: Use wooly nylon or stretch serger threads in your loopers for a nice “full coverage” look.
Picot Hemming:
This hemming technique actually “folds” the fabric on itself, leaving a “flat” hem instead of the bulbous one like with the rolled hem:
*Isn’t this print cute?? It’s one of RCF Easter prints, check out the collection! (link here)
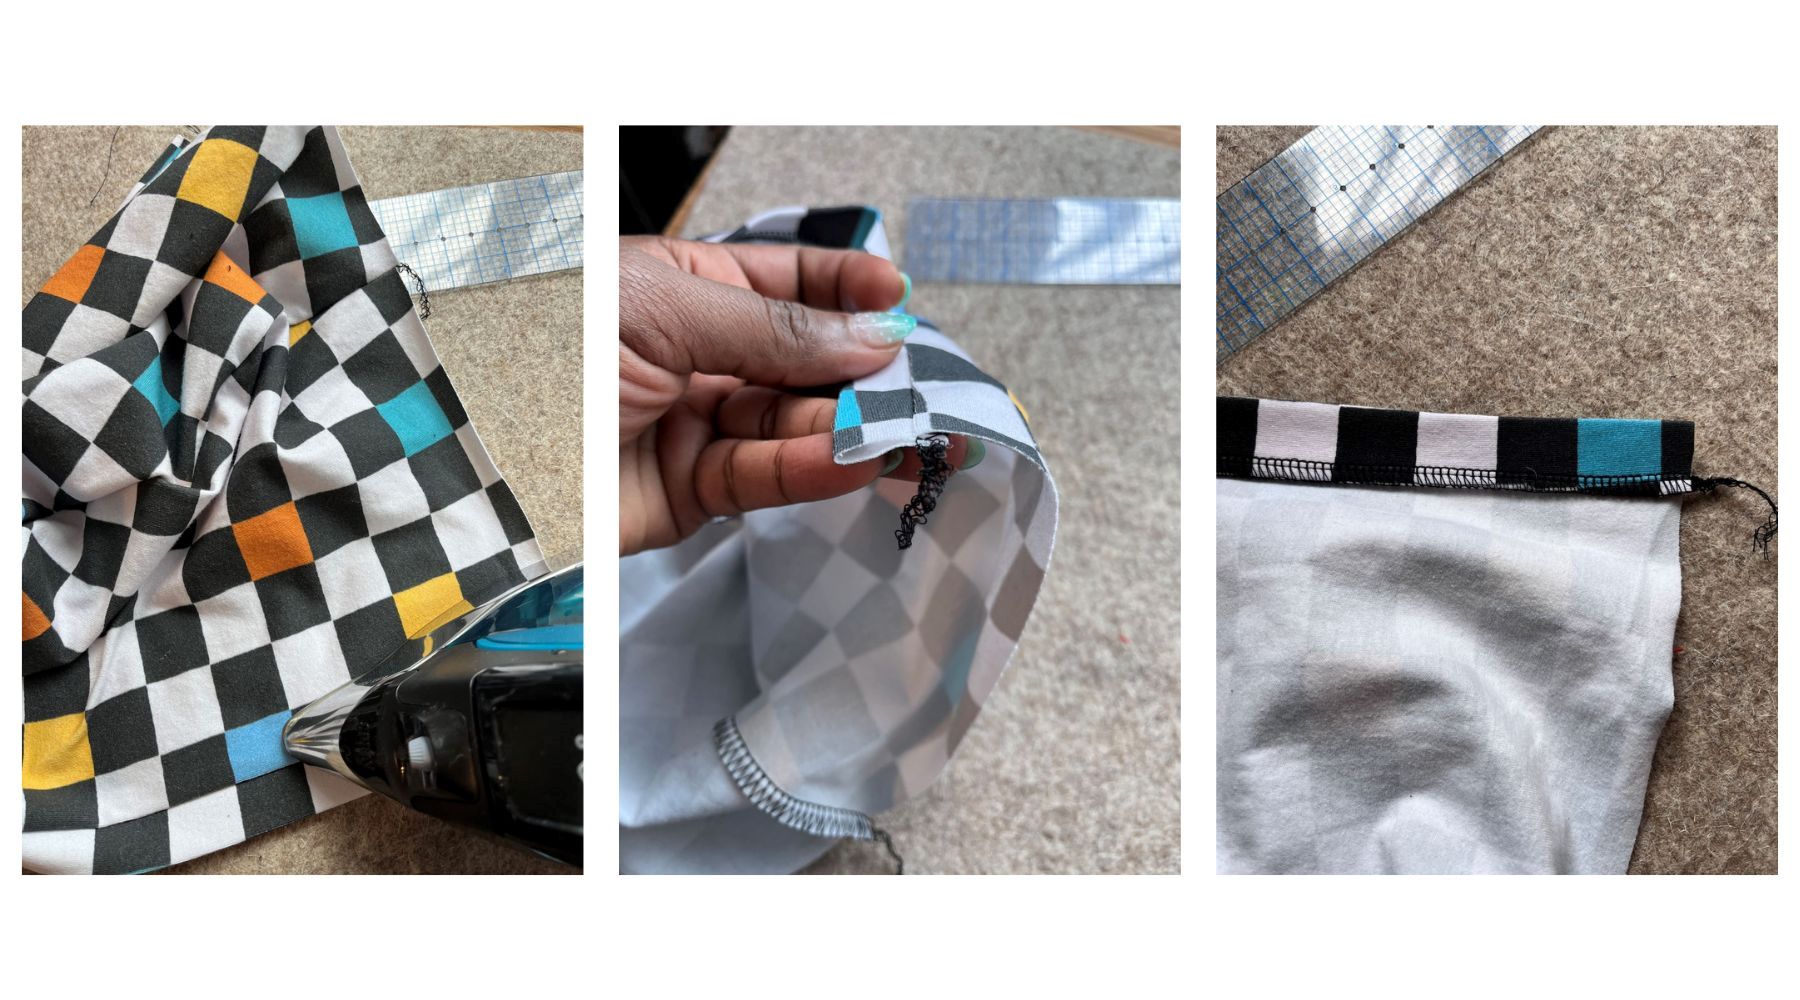
The final method I like to use is not a setting in the manual, but a method that I stumbled upon out of sure laziness haha! (Ya girl loves a good lazy hack >_<)
I call the “fold over” method; it is soooo easy!
Step 1: Add width/length. With this method we may need to add about ½ inch to whatever we are hemming AND adjust our overall hem ¼ inch (this depends on the depth of the original hem).
For example, with the hood I’m hemming below, it calls for a ¾ in hem. Because I wanted to keep that ¾ width, I added ½ inch to the hood AND also increased the hood hem from ¾ ich. to 1 inch. We do this because this method will reduce the intended hem length by about ½ inch. Press under our new hem.
NOTE: For Hemlines, I typically don’t bother with adding anything, because in my personal experience it wasn’t enough to make a difference as hemlines are usually around 1 inch in patterns I use. However, anything that requires a hem of ¾ inch or less, we will likely have better results following my suggestions above.
Step 2: Turn our pressed hem to the RIGHT side of our fabric (it should be 3 layers thick)
Step 3: Disengage our serger knife (you won’t need it, plus it provides an added safety net in case you need to take out the stitching. This way we won’t have to worry about cutting into the fabric)
Step 4: Serge away! We MUST be mindful of our upper looper. If the fabric is too close to the edge, the upper looper can become tangled within our fabric (resulting in a HOT MESS of issues…we don’t want that); this can be mitigated by making sure the fabric isn’t too close to the edge (where our knife would normally be). Don’t forget to press and topstitch (optional)
All done! Press and topstitch if you’d like🤗. I like to use this method for shirt hems, sleeves and hoods! Here is the final look!
Until next time!! <3
-Jas-
Fabric: Glitchy Checks;Retro Spring Collection By Mancio Cueva *Scaled to 1inch by 1 inch squares* (link here)
Pattern: Lowland Kids Hooded Tee (link here)
Social Media: Follow me on Instagram at https://www.instagram.com/sewingwithcway/
February 22, 2023
What what what what what!!!! Option 3 fold over hem just changed my life.
Comments will be approved before showing up.
December 16, 2024
October 01, 2024
Yvonne
February 22, 2023
Thank you for sharing those wonderful post. I also like to do a blind stitch hem on shirts and pants when I’m feeling lazy. I filled the hem allowance over & then flip it & sew along the the wrong side at the fold. It looks like a band but it’s not.
Your post makes me want to try new hemming techniques.