Estimated Turn Around Time: 6-8 Business Days or Less
January 21, 2021
Hello sewing friends! It’s Bonnie back again from @sewloveyou. I think we can all agree that 2020 was the year of comfy and casual sewing. I’m hoping that trend continues into 2021 because I’m all about comfort and cuddling. Speaking of comfort, Raspberry Creek sells one of the most soft fabrics around, the minky cuddle. With so many amazing fabrics on the website, I think sometimes the minky cuddle gets overlooked. Once you try the middle cuddle, you’ll want to sew all the things with it!
Unlike most minky fabrics, the Raspberry Creek minky is made from the Shannon Fabrics base and is double sided. It’s uber soft for optimal comfort and snuggling! The printed side is a shorter pile. And the back side (which is always a solid white color) is a higher pile. This makes the minky a great choice for a super easy and quick blanket! Like most children, my kids are obsessed with blankets. When I brought home the Raspberry Creek minky cuddle, my kids all fought over who was going to get a new blanket from it.
I’ve seen a lot of questions in the Raspberry Creek facebook group from fellow sewists who aren’t sure what to sew with the minky cuddle. There are many questions about how much fabric to buy, how to finish the edges and what else you can make with the minky. A few years ago, Rachel from Handcrafted By Red, wrote up a fantastic blog post here where she discusses other uses for the minky cuddle. But today, I’d love to share 3 easy ways to finish off that minky fabric and get you snuggling in your new blanket in no time!
Where to Start
Before we get into the details of making a blanket, we need to get the fabric ready to finish. First, decide what size you want your blanket. The width of the minky cuddle is 58-60”, so one yard of fabric is great for babies and toddlers. One and a half yards of fabric works for bigger kids and small adults. And two yards is ideal for most adults and older teens. It will be extra cozy with room to share with someone else.
Remember that your fabric is double sided, so there’s no need to pick a front and back to the fabric. Less of an expense and a quicker sew for you!
Prep Your Fabric
After you’ve picked the size of blanket you want to make, you need to cut the selvedge off of your fabric and straighten up those edges. You can use scissors or a rotary cutter, cutting mat and ruler. Next, decide what method you’d like to use to finish the edges. I’m sharing three of my favorites.
Blanket Finish Option #1--Fold Over Hem
The first and easiest way to finish the minky blanket, is fold over those edges 1” towards the wrong side (white solid color) of the fabric and sew it down. You can use a zig zag stitch or a coverstitch machine. With the pile of the fabric, those stitches blend right in and you can hardly see them. Make sure to take note which way the minky nap is going and follow that while sewing. It will make a much cleaner blanket!
You can start by hemming down the sides of the blanket first along the selvedges, followed by the top and bottom. Or you can miter those corners. Go with whatever method you like best! And don’t forget if you use one of the plaid prints in the shop, you can use it to help you get the perfect 1” hem.
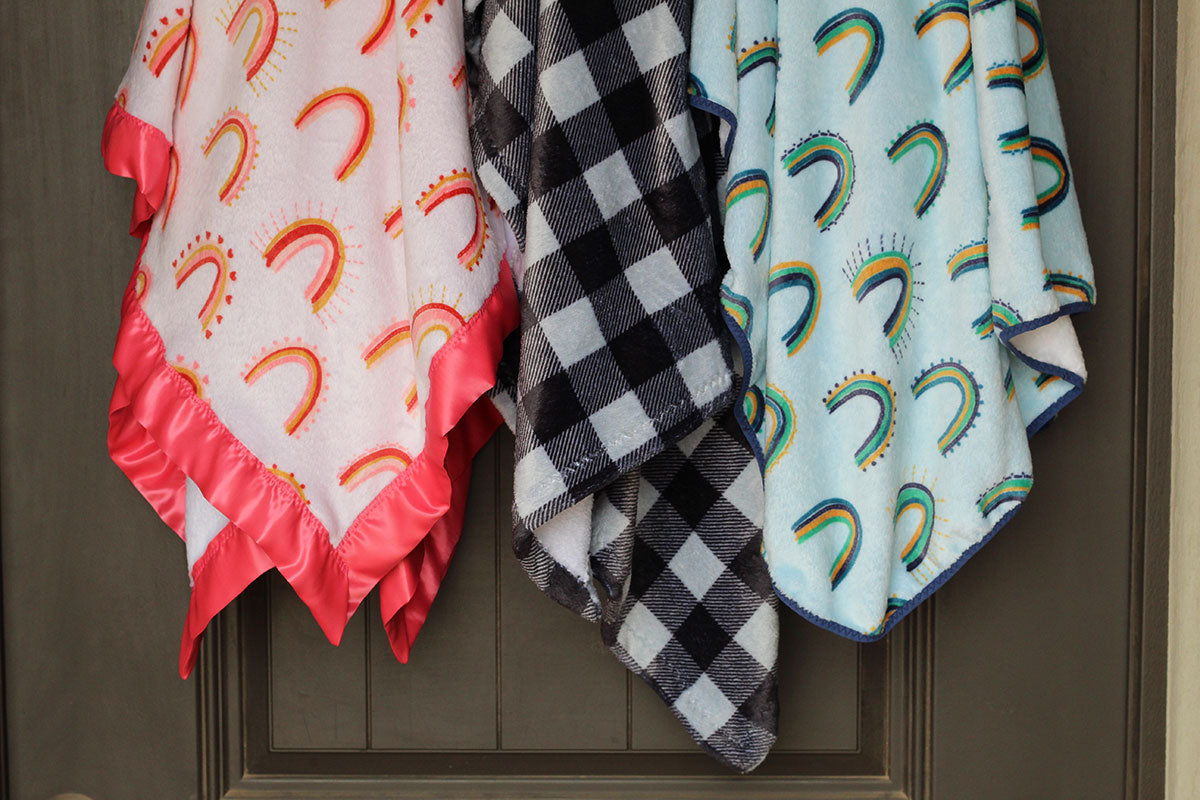
The plaid blanket I made for my oldest son uses this finish. I chose to miter my corners and it was fairly simple. I used 2 yards of Dusty Blue and White Plaid minky fabric and it’s perfect for my tall teen. I hardly ever sew for him and he was pretty happy when I presented him with his new blanket. Since then he’s used it for lounging on the couch and every night for bed.
Blanket Finish Option #2--Fold Over Elastic
Almost as easy as folding over the edges, using fold over elastic (or FOE), comes in as a close second in the quick sew department. Pick your favorite FOE and sew it on. Fold over elastic has a shiny and matte side. I used the matte side and a triple zigzag stitch on my sewing machine.
This technique works best when you round out the corners of your blanket using a bowl as your template. As you sew around the corners, pull just slightly on the fold over elastic to make a smooth finish. I was surprised by how much I liked this style. It may be my favorite! It was simple, fairly quick and gives a small amount of contrasting color to the blanket’s edge.
I made the blue rainbow blanket for my 3 year old son. I used 1 ½ yds of Light Blue, Teal, Navy, Mustard and Seafoam Heart Rainbow minky and 6 yds of ⅝” navy fold over elastic. He was so excited that his blanket matched his baby sister’s and has been dragging it all over the house and outside too.
Blanket Finish Option #3--Satin Blanket Binding
The last finish to make your minky blanket dreams come true is using a satin blanket binding. I had never used satin blanket binding before and honestly it was a little tricker than I thought it would be! I would highly suggest using a walking foot and sew slowly. I used a zigzag stitch to apply mine to the minky, but you could pick your favorite stitch as well.
This technique gives a fun pop of color with the wide satin. Babies and toddlers love the different textures of the minky and satin together. With a little patience you too can make this blanket. All said and done I’m happy with how it turned out!
For reference, the pink rainbow blanket was for my little girl who is 7 months old (but probably more like a 9-12 month old is size!) I could have gotten away with 1 yard of fabric for her blanket, but I chose 1 ½ yards so she could grow into it. I used the Light Peach, Dusty Pink, Coral, Rust and Mustard Heart Rainbow minky and 2 packages of satin blanket binding in Paradise Pink color. She loves her new blanket too and has happily snuggled with her siblings in it all month long!
Comments will be approved before showing up.
October 01, 2024
September 12, 2024
August 29, 2024